


Tips and News
This page is dedicated to producer tips on mixing , production tips and news on new music products. This page will get more updates in the future stay tuned. FYI The latest Maschine 2.9 update Tutorials have been uploaded to the site login and enjoy.

NEW !VIP ULTIMATE 1 TB Portable 246 KIT EVERYTHING BUNDLE
This Flash Drive is the flagship of the VIP SOUNDLAB. This drive provides our sites entire Library of Studio Quality Drum samples for tactile, creative beatmaking with an acclaimed sound library.
-
Contains sites entire collection of 179 Drum Kits Plus a Ton of Extras
-
Includes a large custom library of VIP SOUNDLAB MASCHINE 2.0/2.8.4 Expansions,Custom Nexus 2 instruments, Custom Kontakt Expansions and More.
-
This custom drive will give you Pristine Studio Quality Professional Mixed Drum Sounds.
-
Custom Midi Sequences for the Nexus 2 plugin.
-
Custom VIP SOUNDLAB Kontakt 5 Expansions.
-
Custom VIP SOUNDLAB Nexus 2 Expansion Packs
-
Custom VIP SOUNDLAB Sylenth Expansion Packs.
-
Custom instrument sounds in the style of your favorite instruments such as Stratocaster style guitars , Hammond's , organs , flutes , Pianos, Electric pianos, Wurlitzers, Rhodes, Strings, Synths , Pads, Atmospheres, Access Virus style Sounds , Roland style synths, Club Style synths, Moog style Bass , Leads , Grand Piano's, SF2, SFZ, Reason Sound fonts of just about every major Instrument
-
Reason Sound Fonts
-
Custom Drum Band loops and sounds,Stacked Instruments, Stacked Drums,Dirty South sound fonts , Orchestra sounds like Chellos , Big Brass , Violins and more. Need ambient sounds ? we added a nice collection of those as well. Vintage drum Maschine lovers will enjoy plenty of custom vintage sounds inspired by the TR-808 , 909 , 606, 707 , SP1200 , MPC 60 and just about every Vintage drum Machine there is. Maschine lovers will enjoy tons of Maschine 1.8 / 2.X Ready Drum Kits and sounds.
-
Custom Midi Sequences for Software Synth instrument plugins.
-
MIDI Loops for multiple genres to get your production started fast. Love to slice and chop ? Well we added lots of sample chopping material and samples.
-
Artist / Producer contracts
-
Dirty South Trap sounds , Lex Luger 808 style bass , Heavy Bass Subs , Super Bass 808's , Custom Drum Kit Layers ,
-
Custom Reason Skins & Patches
-
Custom Midi Groove Templates
-
Vinyl lover ? Love to get drums from wax ? contains a Power packed 1,200 Essential Drum Breaks and Loops
-
Our Entire Drum Kit Collection of content from the VIP Database
-
over 246 HD Drum Kits from us all radio ready in a clear Pristine 24-Bit HD Sound Format Delivered right to your front door.
Includes the entire site collection of Drum Kits plus a ton of extras see the info on the right - Fontaine

AKAI PRO MPC 2.6
3.0.3 Firmware Update for Force and 2.6 Firmware update for MPC X and MPC Live
Akai Professional is proud to announce two new firmware updates for the Force as well as the MPC X and Live products. The updates feature multiple workflow enhancements alongside Ableton Live Set Export functionality, enabling users to move their projects from the MPC and Force ecosystems to the Ableton Live platform.
Users can now enjoy a seamless transition from the MPC and Force work environment into that of Ableton Live to take advantage of their favorite Ableton features as well as their virtual instruments and plugin collections. Akai Professional is proud to add one more tool into the immense palette for users to take their creativity and performance to unparalleled heights. Updates Force 3.0.3 and MPC 2.6 also include a host of other new features and enhancements:
New in MPC firmware 2.6:
-
Grid Automation - Users can now input, edit and view automation in Grid Edit and Audio Edit.
-
Step Automation - Users can now input, edit and view automation in the Step Sequencer.
-
Support for up to eight submixes in the mixer window.
-
All-New TUI layouts for Akai Vintage effects.
New in Force firmware 3.0.3:
-
Grid Automation - Users can now input, edit and view automation in Clip Event/Region editors.
-
Step Automation - Users can now input, edit and view automation in the Step Sequencer.
-
Functionality to export all clips or export a single clip - users can now export the clips in their Force project to audio, MIDI or MPC Pattern files.
-
Matrix Mode enhancements - Users can now copy, paste, create and delete clips from the Matrix mode.
-
Convert to Keygroup function - On a Drum track, users can quickly convert a sample assigned to a pad into a Keygroup track so they can play the sample chromatically.
-
Improved external keyboard support for scales selected in Force.
-
New Step Sequencer Mode - Mono Lanes, perfect for single line melodies and basslines.
-
Support for up to eight submixes in the mixer window.
-
Force now works as an audio interface in Computer Mode.
-
All-New TUI layouts for Akai Vintage effects
16 Different Classic FX from ProTools:
- AIR Distortion: Adds instant color to audio signals in multiple modes, and you can create enough distortion to match.
-
AIR Enhancer: Improves low and high broadband frequencies of an audio signal.
-
AIR Ensemble: Applies fluid and glittering modulation effects to the selected sound.
-
AIR Filter Gate: It is a highly appreciated feature that divides an audio signal with relative filtering, expansion and shifting into staccato rhythmic patterns.
-
AIR Flanger: Applies a short modulation delay to the selected audio signal.
-
AIR Freq Shift: It is responsible for changing the frequency of the audio signals one by one by creating a unique effect.
-
AIR Fuzz-Wah: Adds effects with various types and variable amount of audio signals with transistor-like distortion effects.
-
AIR Kill EQ: Immediately silences the low, medium or high frequency range regardless of an audio signal. It is widely used by DJs in today's electronic music productions.
-
AIR Lo-Fi: Applies to sub-sampling and highlighting of the selected input signal.
-
AIR Multi-Chorus: Applies complex Chorus effects to an audio signal.
-
AIR Non-Linear Reverb: Create a virtual and rendered acoustic environment, implements a custom pass or reverse Reverb to the audio signal.
-
AIR Phaser: Phase is applied to the audio signals for the most wanted sharp and porous sounds.
-
AIR Reverb: Reverb is applied to audio signals to create a room or area feeling. AIR Reverb, which is one of the best choices to give effects, sends plugins or adds the main effects to the signal.
-
AIR Spring Reverb: It has a selection of classic spring reverb sounds.
-
AIR Stereo Width: A very useful plug-in that creates a wider stereo in source sound.
-
AIR Talkbox: Adds instant vocal-like resonances to selected audio signals.
12 Different New Addons:
-
AIR Channel Strip: This channel ribbon, specially written for MPC, combines multiple partitions with a quick interface to get incredible results. A high-permeability filter with equalization section has a low - high frequency and a fully parametric medium frequency. Its dynamic section includes the AIR compressor and transition algorithms that create excellence to achieve hard-shot drum sounds.
-
AIR Compressor: The compressor, the main source of production, is used to change the dynamic range when the signal level balance changes.
-
AIR Delay: A classic stereo delay with a feedback path that has a filter inside to shape the tone of repetitions. Ratio and width parameters allow you to obtain a wide range of stereo delay effects.
-
AIR Diff Delay: It is a delay effect which is synchronized with the performance rate and uses adjustable amount of diffusion. This allows echoes to be distributed to reverb areas.
-
AIR Filter: Creates a selectable distortion and reduction type of filtered signals after filtering the incoming audio signal.
-
AIR Maximizer: It is a limiting tool especially developed for professional mastering.
-
AIR Noise Gate: Lets you have smoother transitions with low noise noise.
-
AIR Para EQ: It serves as a quad band parametric equalizer with four independent EQ ranges.
-
AIR Pitch Shifter: Transpose the pitch of the incoming sound, allowing you to experience different sound intervals with different algorithms.
-
AIR Pumper: The assignable speed creates a rhythmic pumping effect with the shape of the envelope, keeping the depth elements in the foreground.
Also included is the new MPC 2.6 software Mother Ducker and Mother Ducker. As a highly demanding processor, it offers MPC standalone mode and side-chain effects in desktop software. In addition, the interiors of clip programs will be significantly improved to allow MPC users to play up to 16 programs simultaneously, allowing clips to be played in live performance scenarios to provide greater flexibility when changing track or sorted strings.

In this video we take a look at the MPC Live 2.1 Internal Sampling using it to sample from Youtube Click the video on the right to view. - Fontaine

In this video we take a look at the MPC Live 2.1 chop mode and its sampling features. Click the video on the right to view. - Fontaine

In this video we take a look at the MPC Live 2.1 Audio Warp & Semi tune features. Click the video on the right to view. - Fontaine

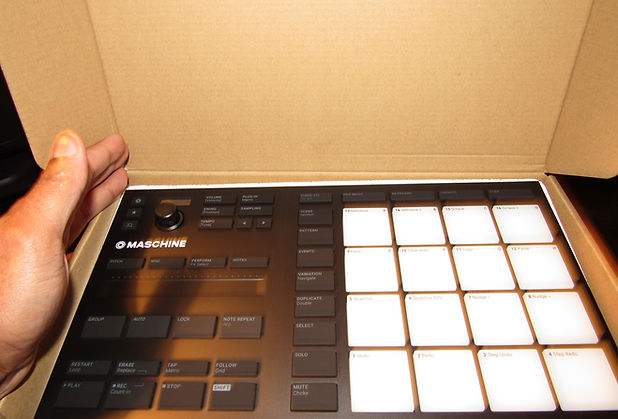
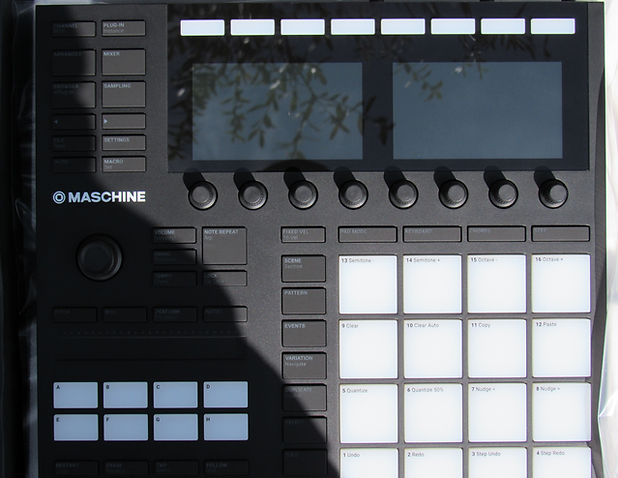
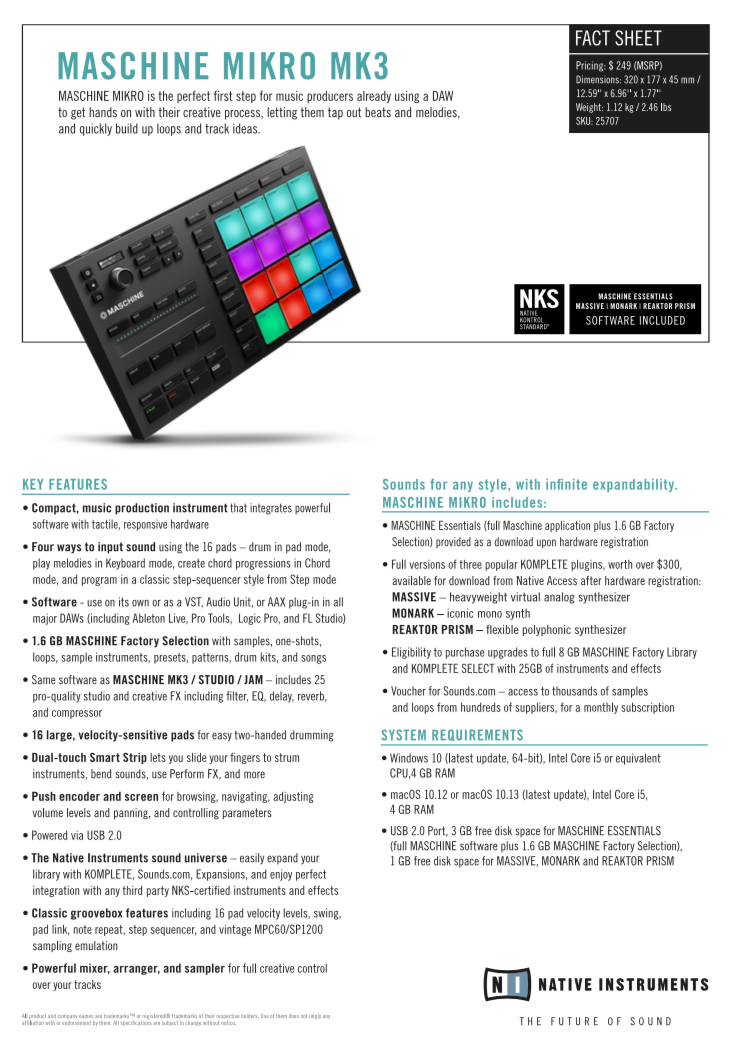
NEW ! MASCHINE MK3 & MIKRO MK3 FIRST LOOK & REVIEW

Maxx Volume Tips and Tricks
When it comes to snare drums, MaxxVolume is it! Key reasons to add compression to a snare are to control overall level, smooth out inconsistent strikes, and bring up soft notes like rim shots. This plugin does all these tasks exceptionally well, even adding a gate. Dial down the threshold to keep your snare gently compressed the whole time, then raise the threshold on the soft notes to make them louder and to shrink the dynamic range. Add the gate last, and bingo – you’ve got a killer consistent snare you can build your entire mix around.....
Side Chaining Tips
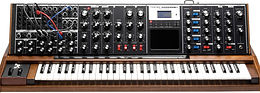
Looking for Hardware for Sound Design ?
Here is 10 of the more expensive hardware synths some may call the best. This is in part due to the gratification of instant feedback when tweaking knobs and sliders, along with circuitry and operating systems that have been optimised for a single job.
Greetings fellow producers and Beat makers. I just wanted to share some really great information on side chaining and how to use it the right way. Most of the time when you think of Side-chaining producers will think that’s what you do to your bass to stop it clashing with your Kicks, but there are many other ways can use it too, from de-essing vocals, to making a Harmony or a Melody line cut through a mix more easily. I had found some pretty cool techniques by getting my feet wet awhile back and diving in to it. As you know sometimes things can get scary when you are first learning , but expierence is the best teacher in my opinion. Here is a very interesting article i had found on the interent on pretty website called soundonsound.com if you have not heard of them you should check them out as they have a ton of information on various music production tip and techinques. Lets get deep in the article and check out the infamous Side Chaining.
While software plug-in emulations of compressors and gates may include options for external side-chain access, or for filtering the side-chain signal, it seems that many users are ignoring these features because they're not entirely sure what they are for. Essentially, they do the same job as their hardware counterparts and this short feature aims to explain exactly what a side-chain is and how external access and filtering may be used.
Chain reaction
Both gates and compressors normally work by monitoring the amplitude or intensity of their own inputs, so that they can detect whether the level is above or below the threshold value chosen by the user. While some classic hardware compressors use an alternative system, where the threshold is fixed and the user instead sets the amount of compression by adjusting the input drive level, the outcome is much the same: if the signal rises above the threshold, the compressor or gate responds.
The part of the circuitry that monitors the input level is known as the side-chain, and it controls that part of the circuitry that adjusts the gain of the main signal path. In previous articles I've likened this to an engineer who listens to the sound level coming over his monitors and then makes adjustments using a mixer fader when the sound gets too loud.
In most situations the side-chain monitors the input level, although there are some designs, particularly limiters, that monitor the output level instead. Although it is significant to the technical operation of the device, this circuit topology detail doesn't greatly affect the way the user sets up the compressor.
One very simple way of modifying the behaviour of a dynamics processor is to apply high- or low-cut EQ to the signal before it reaches the side-chain. This doesn't affect the tonality of the main signal path but it does affect the way in which the side-chain responds to what it hears. In the case of a gate, side-chain filtering is often built-in and is used to make the gate less sensitive to the extremes of the audio spectrum so as to prevent, or at any rate reduce the likelihood of, false triggering from sources such as microphone spill. The best way to explain this process is to consider an example.
Let's assume that we have a microphone on a tom-tom that is part of a drum kit. We have set up the gate to get rid of the low-level ringing that often occurs as a result of sympathetic resonance (usually when you hit the kick drum). Because this resonance is at a fairly low level, we can set the gate threshold so that the gate closes shortly after the tom has been hit. So far so good. But if you have a cymbal near the tom and hit it hard, the amount of spill into the tom mic might be enough to cause the gate to open. By putting a high-cut filter before the side-chain, we can EQ some of that cymbal sound out of what the side-chain 'hears' so that it is less likely to cause the gate to open in error. Yet, when the gate opens, you can hear the tom-tom without the EQ.
Similarly, if the bass drum was being picked up in the snare mic and causing the snare gate to open unnecessarily, you could put a low-cut filter before the side-chain input to reduce the risk. Drawmer gates have both high- and low-cut filters with controls to vary their frequencies, so that the gate essentially triggers from the frequency range bounded by the two filters. Material falling below the cutoff frequency of the low-cut filter or above the cutoff frequency of the high-cut filter is largely ignored. This filter arrangement has since been adopted by a number of other hardware and plug-in gate manufacturers.
To set up the filters most effectively, you need some way to hear what the side-chain is hearing and this is usually provided by a 'side-chain listen' or 'key listen' switch. When this switch is active, you hear the filtered version of the signal, enabling you to adjust the filters to pass as much as possible of the wanted sound and as little as possible of the spill that is causing you problems. Once the filters are set, you can turn off the key listen and adjust the gate threshold and release time to get the best results. It is important to realise that the side-chain signal doesn't have to sound 'nice', as nobody is going to hear it. What you are trying to do is emphasise the amplitude difference between the strongest part of the wanted signal and the unwanted ones, and that usually demands very severe and harsh EQ settings.
In the case of drums, don't worry if the closing of the gate sounds a little unnatural on its own when soloed or if the occasional drum or cymbal breaks through, because these artifacts tend to get completely hidden when you add the drum overhead mics (which should not be gated). What you are trying to achieve is an improvement in separation and control. Although the individual elements may not sound perfect in isolation, the end result should sound much better than if you chose not to use a gate at all.
|
Side-chaining In Popular Sequencers
Protools and Logic seem to have pretty flexible and intuitive routing systems. Digital Performer also has some good side-chaining options for both audio and MIDI signals and these were covered in an article on gating in the April 2003 edition of SOS. Users of Sonar and Cubase SX face more challenges when it comes to side-chains and neither application currently offers the same direct routing as those mentioned above. While there have been some innovative plug-ins that use two components, to set up a side-chain source (FXpansion's Vocoder being one of the earliest examples), these are few and far between. Several Cubase users have expressed their frustration at this on Steinberg's online forums and there have also been several discussions on the SOS forums, focusing on workarounds to allow side-chaining within Cubase SX. The technique is not always immediately obvious, but in the Q&A section of SOS September 2005, Sam Inglis explains a workaround using quadro or surround channels. Martin Walker also explains in the April 2003 gating article mentioned above how you can use Steinberg's MIDI gate plug-in as an alternative solution. Promisingly, Steinbergappear to be responding to the groundswell of user feedback: while there is no mention of side-chains in the new features list for Cubase 4, their online FAQ states that the new VST3 standard supports side-chaining and, while the functionality does not feature in the first release, it will be implemented 'within the Cubase 4 product cycle'. Watch this space! Matt Houghton |
External Gate Keying
Rather than feed the gate's side-chain from its own input, you may find that you have an external side-chain input that allows you to control the gate from a separate signal source (usually another audio track in the case of a plug-in). One way to visualise this is to imagine an engineer adjusting a fader according to the level of a track he's hearing over the monitors but the fader is in fact controlling a different track altogether
|
The diagram illustrates two alternative configurations for side-chain control. In the top diagram, the gain control is determined by the primary audio input signal, whereas in the lower one, a secondary signal is routed to the side-chain and therefore controls the gain of the other. |
One of the oldest examples of how this might be useful is to place the gate in a track that has an over-busy bass guitar part, then trigger the gate's side-chain from the kick-drum track. This forces the gate to open only when a kick drum is present after which it closes at the rate you set using the release control. As a result, the only bass guitar you hear is that which plays at the same time as the kick drum. The rest gets gated out. How natural this sounds varies, depending on how the bass part was played originally, but this trick can tighten up an otherwise messy bass part. You can also feed in rhythmic signals to produce controlled 'chopping' effects: for example, breaking up a synth pad in order to create rhythmic bursts.
Yet another trick possible using external keying is ducking, although the gate must have an attenuation control that allows you to input negative as well as positive values for this to work. Ducking is traditionally done using compressors, but a number of modern hardware and plug-in gates have the necessary features to allow them to function as very efficient duckers. Normally a gate has an attenuation control that determines by how much the signal level is reduced when the gate is closed. If the attenuation can be set to a negative value, as it can in Logic's gate, then the signal level actually increases when the gate is closed. What's more, you can dial in by exactly how many dBs you want the level to increase when the side-chain input signal falls below the gate's threshold.
A good example of how this feature might be useful is placing the gate in a busy guitar track and then triggering the side-chain from the lead vocal. You can then adjust the gate so that when the vocal is present, the gate is triggered and the signal level passes through at unity gain. When the vocal is absent, the gate closes and the guitar part is boosted by however many decibels of negative attenuation you have set on the gate controls.
The reason for doing this is so that you can have the guitar part a couple of dBs louder in the absence of vocals. Then, when the vocals are present, the guitar level drops back a little to allow the vocals to be heard more clearly. The technique is exactly the same as the one used by radio DJs, where a ducker is used to drop the level of the record whenever the DJ speaks. This is a useful way of keeping the vocals audible in a busy mix without having to automate the instrument levels manually.
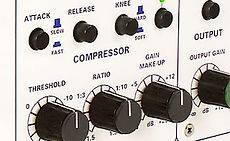
Compressors
We can access the side-chain in exactly the same way with many compressors and, as you're probably aware, compressors can also be used to perform ducking in conjunction with a side-chain input from another track. However, the end result of filtering the side-chain in a compressor is quite different to what happens in a gate, even though the object of the exercise is still to make the device more or less sensitive to specific frequencies.
For example, to use a compressor for de-essing, we simply insert a peaking (band-pass) filter into the side-chain input path and boost the signal in the region where sibilance occurs (typically 4-8kHz). If we were to boost that range by 10dB, then the compressor would be 10dB more sensitive to those frequencies and apply gain reduction whenever those frequencies were loud enough to push the signal level over the threshold. Of course, a simple de-esser like this reduces the gain of the entire audio signal whenever there is enough level in the sibilance range to trigger the threshold, which means that over-use can lead to the vocals taking on a rather unnatural lisping quality. However, it still provides a good example of this principle.
|
The compressor is inserted on the first track (a backing submix) but its actions are controlled by the second track (vocal). When the vocal signal exceeds the threshold, the submix is automatically compressed and reduced in volume. The submix itself has no impact on the operation of the compressor. Note that, to compensate for the attack time of the compressor, the vocal track has been slightly advanced ahead of the submix. |
By setting the peaking filter to around 40Hz, the compressor can be made most sensitive to very low frequencies, which may be useful when trying to reduce the subjective impact of popping on a vocal track. Although this won't eliminate pops, it will reduce them in level.
While most software plug-in compressors don't allow you to insert your own filters into the side-chain input, there are often dedicated de-esser plug-ins available that combine the necessary compressor and side-chain filters. With a suitably equipped hardware compressor, you can patch any type of equaliser into the side-chain input using conventional patch cables. Note that some hardware compressors include a side-chain insert point, which makes it even easier to patch in your equalisers.
One workaround for creating a de-esser, using a compressor plug-in with an external side-chain input, might be to copy the audio being processed to another audio track, and set up the compressor to access that as its side-chain source. Then you use a filter plug-in on your newly created side-chain control track to locate the problem area, such as sibilance, and boost those frequencies as much as possible, taking care not to allow the levels to clip. You can use your bounce function to make this EQ change permanent if your DAW takes its side-chain feed before any insert plug-ins added to the control track. Now the EQ'd track will control the compressor so that it is most sensitive to the region you have boosted.
Compressors are also widely used for ducking, but in my view they are not as predictable in this role as gates. Why? The amount of gain reduction applied by a compressor depends on the ratio you set, and on the amount by which the input signal rises above the threshold. If you control the ducking process using a vocal track as the side-chain input, the most gain reduction will be applied when the vocal is loudest, when what you really want is either more gain reduction to drop the backing parts when the vocal is quieter or a system that always drops the level by the same amount once the vocal track rises above the threshold. With a gate you can be very precise as to how much gain reduction is applied but using a compressor it will always vary to some extent. However, the higher you set the ratio, the less the amount of gain reduction will be affected by the absolute level of the side-chain signal, as long as it is high enough to cross the threshold. For this reason, a compressor with a ratio control that goes right up to hard limiting is the best choice for ducking.
A potential problem when using either a gate or compressor for ducking is that the 'duck' can't happen until fractionally after the controlling signal has started. This can be fixed in a DAW by advancing the control track in time so that the duck happens fractionally early, and setting the release and hold times so that the 'un-ducking' rate is appropriate. You might also consider using plug-ins that have an inbuilt look-ahead facility, although most will probably not look ahead far enough for this purpose. Of course, level-automation is used to do this manually and more precisely in many cases, so duckers are not quite so indispensable as perhaps they once were.
Most of the time, compressors and gates are set up to process their own input signals, so all you have to do is patch them into an insert point. I hope this brief introduction to side-chains will inspire you to explore some of the more esoteric applications of gates and compressors, whether hardware or software.
Source: http://www.soundonsound.com
Published in SOS November 2006